Showing posts with label My Wedding. Show all posts

Sunday, April 8, 2012

DIY Wedding Flowers

I decided pretty early on in my wedding planning process that I would be doing most of the wedding flowers myself (my wonderful friends and family were also a tremendous help and I would have lost my mind without them).

I did a lot of research before I made my decision but knew off the bat that DIY flowers was most likely the way to go to save on cost. For the amount of flowers and style I wanted, having a professional do the work would have cost a very pretty penny. I did interview a couple florists, and discovered that I'd save about half the cost by doing DIY arrangements.

The style of our wedding was glamorous, and our colors were white, black, pink, and gold. I planned to use all white roses sitting upon the tallest possible tapered vases.

My inspiration:


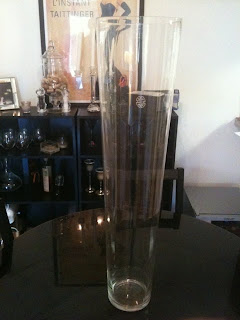
I ordered 12 31 inch, tapered vases from Wholesale Glass Vases International for $25 a piece, which was a steaming deal in comparison to other retailers and wholesale websites I looked at. Their customer service was excellent, and shipping was super fast.

Here's one of the vases sitting atop my kitchen table:
In addition to the vases, I ordered hanging crystal pieces from Koyal Wholesale, you can see the ones I ordered here.

To make your own floral arrangements with fresh flowers, you'll need:
- wet foam bricks
- floral tape
- clear bowl or tray to fit on top of the vase opening
- garden scissors
- buckets
- flowers
- flower food

I ordered 1,000 roses and 50 hydrangeas for all of the centerpieces and bouquets from Costco's wholesale floral department. I will be completely honest and say that the flowers gave me the most anxiety over every other wedding detail. I worried that they'd brown and die under my care, I worried that I'd order them to early and not have them at their prime on the wedding day, and the list goes on. Looking back, I don't regret my decision at all, and I would do it again in a heartbeat.

I was so incredibly lucky to have my friends there for me to help care for the flowers and help arrange them. One of my dear friends had gotten married several months before me used Costco as well, and knew how to care for the flowers once they arrived at my house. She was so incredibly kind to come over the night they arrived, and clipped 1,050 flowers with me.

Here's what boxes holding 1,050 flowers looks like 3 days before your wedding (suitcases, gifts etc everywhere as well):

Before unpacking the boxes, I filled about 20 buckets with water and put the flowers in, in their wrapping to keep the petals safe and closed. After they were all unpacked, we clipped each stem about 1/2 an inch diagonally for better water absorption. This was to be done every other day until arranging the centerpieces, so we only did this a total of two times. Because I was super paranoid, I kept our house as freezing as we could possibly stand to keep all those white flowers alive. Side note: white flowers are very sensitive. One touch to the petals, and they're at risk to brown.

The original plan was to only use roses, but after a trial run, I realized there were too many gaps in the centerpiece, and to fill those spaces would have cost a lot more. Since i love hydrangeas, I decided to add 3-5 to each centerpiece to fill space since they're approximately the size of 5-10 roses a piece. I cannot stress enough how important a trial run is!!!

Here's how to arrange centerpieces in a sphere shape:

Step 1: Cut all flowers diagonally.

Step 2: Soak 1 wet foam brick for about 30 minutes in cold water until completely saturated. Once the flowers are placed into the wet foam, they will receive water and stay fresh for several days.

Step 3: Put the wet foam brick in your bowl (I used clear bowls from the dollar store so that they wouldn't show too much through the vases).

Step 4: Place your floral tape in a criss-cross pattern over the entire bowl, on top of the wet foam. This will be your guide as where to place the flowers and it will keep the wet foam from sliding around.

Step 5: Insert 3 hydrangeas in a triangle shape into the wet foam.
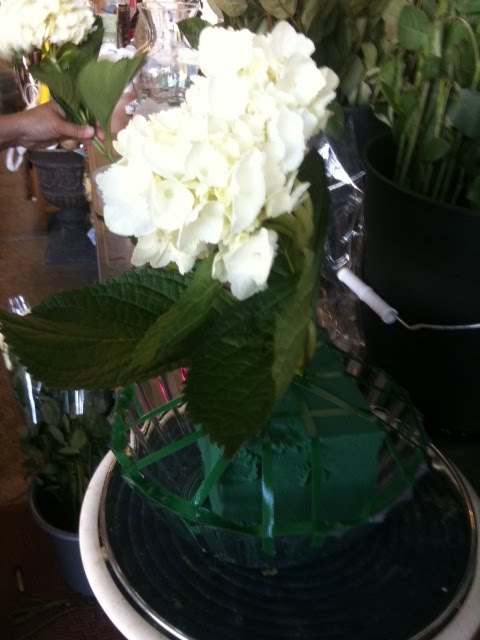
We started by placing one in the middle, and then two around it, in the shape of a triangle.
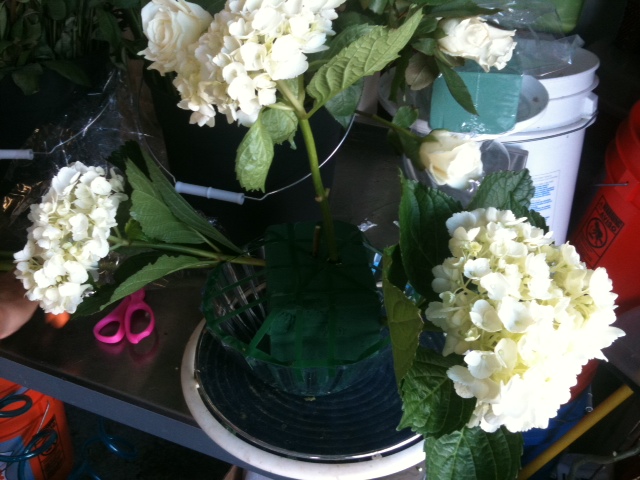
Step 6: Around the hydrangeas, add about 75 roses. Place your bowl directly in/on your vase.

Some of the centerpieces came out a little sparse, but since we had extras, we filled the spaces with extra roses and hydrangeas. Here are a couple before we added a few flowers to fill space:

If you want to add hanging crystal to your centerpieces, you'll need floral picks to loop onto a piece of the crystal hooks, and simply place the picks into your wet foam as desired.

Since I have two cats, I there was no way I was going to keep the completed vases and centerpieces in my house, so I did pay a florist to store them in her shop for one night.

I really hope this was helpful to brides who are thinking of going the DIY floral route. Given how nervous I was about taking on this venture, I wish I had someone tell me it was going to be just fine.
I would love to hear from brides who did their own flowers and what the process was like, and if anyone has questions, please ask!

xo
Lynn


Tuesday, November 1, 2011

Wedding Trailer

I am SO excited to share our wedding trailer! I have to say, I was more excited to receive our wedding DVD than our photos. Rain Studios went above and beyond my expectations, and they were so much fun to work with. I highly recommend them to California brides!
Hope you enjoy!


Friday, September 2, 2011

Wedding: The Dress

Here I am, a little more than three months after my wedding, finally getting around to doing a series of wedding posts. I'm going to be very honest by sharing my ups and downs with all of you. I do not want to sugar coat the wedding planning process, because I would be lying to say that it was easy and perfect. I hope that I can inspire and help other brides by telling my stories and sharing tips and suggestions that I learned, many times the hard way!

I'll start by saying that I planned my own wedding; I did have a venue wedding coordinator to guide me and help with logistics but in all other respects I was on my own. I absolutely loved planning my wedding, even though sometimes I wanted to rip my hair out it was stressful at times. Google docs, Inside Weddings, Martha Stewart Weddings, Bride and Bloom magazines were my best friends during the planning process. My wonderful, talented, and beautiful bridesmaids were also always there for me and I really couldn't have done it without them!

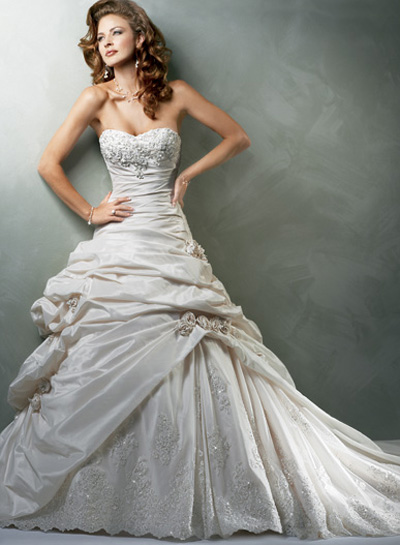
I fell in love with the Maggie Sottero Sabelle wedding gown right after I got engaged. It sounds cliche, but as a little girl (and into adulthood) I wanted to look like a princess on my wedding day, and the Sabelle dress is exactly that, a princess dress. 
I went to try it on, and absolutely loved it. I decided not to buy it that first time because I had 20 months until my big day and wanted to browse and try on others before making my decision. I cannot even tell you how many wedding dresses I tried on in the span of 16 months. Among my top picks was the Kenneth Pool Degas gown, a very different dress than the Sabelle. After trying on the Degas gown, I flirted with the idea of a more modern, clean, mermaid or drop waist gown which is a stark contrast to the Sabelle- a dress complete with every imaginable detail: crystals, lace, silk, rosettes, asymmetrical shape, a cathedral length train, and some pickups (which I usually abhor). 

I purchased a Barbra Allin gown that was majorly discounted at a sample sale, with the hopes of altering it to fit the princessy style I'd always envisioned. I liked the dress, but I had hopes of reincarnating the blank canvas of a dress into something completely different. MAJOR mistake, ladies! 
DO NOT buy a wedding dress under these circumstances, no matter how much the price is reduced. 
In the end, to "fix" this dress would have cost me more than the dress itself. 

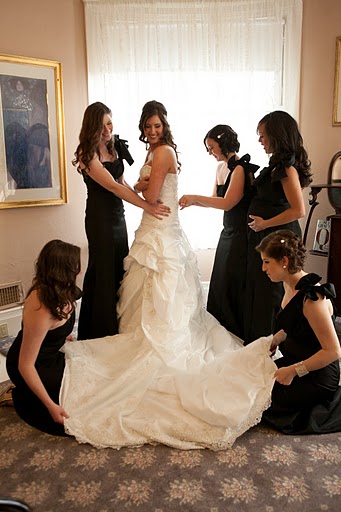
12 weeks before my wedding, I bought the Maggie Sottero gown I had fallen in love with first. 


{wiping my lipstick off my husband's face after our first kiss}

After my dress saga, the most important things I learned were:

-Buy the dress that you can't say no to and can't keep your mind off of.

-Only take one or two people dress shopping, those who know and understand your style.

-For women of all shapes and sizes: make sure there is support BUILT IN to your gown! As you can probably see, I am big busted. I did not wear a bra on my wedding day because 1. When the bra is not attached to the dress, you'll naturally have the urge to pull up one or the other. 2. I had lots of support built in to my dress, and did not need to wear a bra. 


Monday, July 18, 2011

Bachelorette Weekend in LA

My bachelorette weekend was about two months ago and I figured I should start here before doing wedding posts. My maid of honor planned everything and kept me in the dark about everything but our destination (Los Angeles). She did an amazing job planning and organizing everything, from the car ride snacks to restaurants she knows I love or have always wanted to try. 
Here is the PG version of the weekend...
We stayed in the gorgeous Hollywood Glamour bungalow at Villa Delle Stelle in West Hollywood

Shoe shot before our first night out
Delicious Coconut Creme Brulee at Geisha House
Blowouts at blo

I asked for a combination of "Holly would" and "hugs, sex, and rock and roll"

Drinks and dinner at Lexington Social House
Poison Ivy-best drink ever! 
Dancing and an unexpected Maggie Berry fashion show at Supper Club
There was an amazing acrobat performing above us almost the whole night!
Miss J on the red carpet at Supper Club-pretty sure he was there for the fashion show
I met Jo from RHOC in the bathroom(!!) and she was super sweet. Please try to ignore the white rectangle, where I blocked the suggestive straw I had wedged in my dress :-/


Rooftop brunch at Barney Greengrass before heading back to the bay.


Friday, May 27, 2011

I'm back...and MARRIED!

I wanted to give you all a little peak of my wedding from Sunday. I am planning a huge wedding recap with all of the details + DIY projects once I get the professional photos, so look out for that in the near future!
Here we go...

Bridesmaid's bouquets
Chuppah flowers
Something blue
The cake-our vows were written on the top and bottom tiers

Wednesday, March 23, 2011

Wedding Bracelet

This past weekend I went out to buy the bracelet I'd been eyeing for about a year to wear on my wedding day. I was hesitant because I knew it would be hard to find earrings that match, since I want glamorous, teardrop shaped earrings. I still haven't found the perfect pair but I went ahead and bought the bracelet anyway because I'd exhausted pretty much every department store I could think of, as well as local boutiques to find a comparable style, and I just could not stop thinking about it since I first saw it at Haute Bride in San Francisco.
Without further ado...The "Petit Glam B912" Bracelet:
If any of you have suggestions as to where to look for earrings, please let me know!

Friday, December 17, 2010

Our Wedding: The Save The Dates

Now that all of our Save The Dates are sent out, I can finally showcase them here. I am lucky to have my dad, who is a graphic designer and owns a family business print shop design these exactly how I wanted them. I knew I wanted something different from the norm, and after looking through hundreds of designs, I chose to use Vera Wang's crown emblem that she uses as caps to her perfumes so that we were able to include the royal theme of our wedding onto the Save The Dates.
The fonts used were Weiss and Balmoral (for our names), all of the text & crown was printed letterpress.
I knew I wanted to use a heart in another area to match the one within the crown without being too cheesy, and embossing it was the perfect way (IMO) to do so without it being over the top.
After I selected the design, my dad added a custom monogram to the metallic gold crown.

For soon to be brides: make sure you order extra envelopes and invitations/Save The Dates "just in case" and for keepsakes. 

Tuesday, November 16, 2010

Lavish & Fabulous

Last Thursday (Veterans Day) I had the pleasure of attending a beautiful wedding event in Sacramento; Lavish and Fabulous at Arden Hills. The event featured several vignettes and tablescapes set to inspire. Although I have my wedding decor pretty much all planned, I did steal some *fabulous* ideas from the event. If you're a bride who need ideas, or just love interior design, you'll love the photos below...

{Entry Way}


There were two harpists playing as we entered into the first room

Future SIL and I

{Moulin Rouge}
Each vignette included a dress to match the theme, this one was my favorite!
This Table was covered in real roses and various other pink flowers, with raised glass place settings. I am considering stealing this idea...


{Spanish Eyes}


{Urban Cowboy}


{Heavy Metal}


{All you need is Love}


{Havana Nights}
Havana Nights was a lounge area with a coffee and cigar bar
and there you have it!

*I'm kicking myself now for not taking photos of ALL the beautiful dresses!