Tuesday, June 5, 2012

What To Wear To A Summer Wedding

Can you believe that wedding season is in full swing? I'm still stunned that my one year anniversary passed two weeks ago, and one of my dearest cousins got married this past weekend after years months of planning our weddings together.

When figuring out what to wear for any wedding, it's always helpful for me to take in to account all aspects: the location/venue, weather, guest list, time, and how formal the wedding will be.

My cousin's wedding took place in southern California thisclose to the beach during a warm evening, and I knew I wanted to wear a pleated dress, so when I found this pleated BCBG maxi dress, I snatched it right up for the wedding.

Formal enough for an evening wedding? Check.
Will it keep me covered and warm enough? Check. 
Season appropriate? Check.

Pleated dresses are among Spring and Summer's (and Fall '12!) hottest trends. I love how girly pleated dresses and skirts are, and I really love the light, ethereal look pleated dresses provide.


Chloe
Doo Ri 

I wore some blingy Forever 21 earrings, my wedding bracelet, and borrowed my Grandmother's diamond necklace with the dress.

The husband and I


Now onto planning what to wear for three fall weddings (during the same month!)...


Monday, May 14, 2012

Protein Pancakes

I'm a pancake lover. Before I experimented with making protein pancakes, I could throw back five + pancakes in one sitting. Not so great since the traditional pancake is filled with sugar and oil.

Here's what you'll need to make protein pancakes:

-1 scoop whey protein powder (I use the vanilla flavor)
-1/2 teaspoon vanilla
-1/4 cup quick oats
-4 egg whites
-1 teaspoon cinnamon
-1 teaspoon flax seed

Whisk all of the ingredients together, spray a pan with non-stick spray and cook pancakes on each side for about 1 minute.

I like to drizzle a little Agave nectar or sugar free syrup on top. They're yummy, healthy, and very filling!

xo
Lynn

Sunday, April 29, 2012

Eats From the Past Week


I omitted the cheese from this recipe, and added roasted cauliflower with a tiny drizzle of grapeseed oil, garlic, and pepper. So good!

Eggplant Pomodoro


Whenever I'm craving pasta, I buy brown rice, gluten free spaghetti pasta. I will update soon with the brand I buy (it's not gross and mushy like some gluten free options are). I chopped up one eggplant, a box of about 50 grape tomatoes, and greek olives, then sauteed them with a little grapeseed oil for about 10 minutes. Add the sauteed veggies on top of the spaghetti, and sprinkle with some red pepper flakes. When I make this recipe, I usually make a 2:1 portion of veggies/pasta.

xo
Lynn


Thursday, April 19, 2012

Health & Fitness

I have been thinking about adding nutrition and fitness posts to my blog for a long time now based on my experience and research. I have lost 55 pounds over the course of 2 years by eating clean and exercising regularly and am ready to share my experience here!

I was (and still am) not so confident about posting "before" photos of myself on the blog, but I feel as though my experience can help others (and seeing 'before and afters' are my favorite part of these kind of posts!)

Let's start at the beginning:
Throughout my childhood I was super skinny, and most of my adult life I've been a healthy, average size. I never had weight issues until I went on a medication that caused my metabolism to slow times (what seemed to be) a million. Over the course of three months, I gained 40 pounds. This weight gain lit a fire under my butt and I started upping my 1-2 day/week exercise schedule to 4-5 days per week of cardio, both on the elliptical machine or spin class. I lost a few pounds, but nothing significant.

June 2009

July 4, 2009

I ultimately decided that I needed to go off of the medication in August 2009 for several reasons. Once I did, the weight fell off. I was almost back to my pre-medication weight after about 4 months by keeping the same lifestyle of doing cardio 4-5 days/week and eating ok (I definitely didn't care as much about what I put in my body then as I do now).

I got engaged in September of 2009, and wanted to really start pushing myself to lose more weight and tone up for my wedding. I started going to group fitness classes using weights and I loved the results. My gym introduced Le Mills Body Pump classes in 2010, and that's when I really started to get more of a grip on my fitness goals. I went to Bodypump 2-3 days a week and did cardio on my own as well 1-2 days a week. The pounds fell off. On my wedding day, I had lost 60 pounds from my heaviest weight. Since then, I've gained 5 pounds of muscle.

Photo credit: lovingfit.com

About Bodypump: Bodypump is a one hour workout using weights the entire time, with no rest and high repetitions. You work your entire body during this workout: legs, glutes, biceps, triceps, back, abs, and chest.

Before I was introduced to weight lifting, I thought the way to lose weight was to log in endless hours on the treadmill/elliptical/bike, which I did for a long time with little results. I've learned that weight loss and fat loss are completely different. Aerobic exercise does burn fat, but it also burns muscle (read more about this topic here). Lifting weights not only encourages fat loss, but replaces the fat with muscle and increases metabolism 48 hours after weight lifting.

In addition to one-hour Bodypump classes 3-4 days a week, I do HIIT (High Intensity Interval Training) 1-2 days per week for an hour if I'm being good! HIIT consists of 2:1 interval work, for example one minute of sprinting and 30 seconds of walking, repeated several times. HIIT increases your metabolism, and doesn't burn through muscle like consistent cardio does.
I do need to work on increasing HIIT, as I do get a little lazy sometimes!

As for my diet, I eat very clean, however I am not restrictive with my diet ALL the time. When I go out with friends = bring on the yummy appetizers and dessert! Since I am strict with my diet 90% of the time, having cheat days and occasionally eating whatever I want works for me. When I say "strict", I don't mean that I'm starving myself by any means. I mean that I do not regularly eat fried food, sugar, an excess of carbs, soda or red meat. My typical meal usually includes high protein and lots of vegetables.

This has become my lifestyle, and I have never felt healthier in my entire life. I still have goals I want to reach and am not "done", and never will be.

Finally, here I am today:

April 19, 2012

I am looking forward to sharing my favorite healthy recipes, workout tips, and updated running music lists etc with all of you!

xo
Lynn

Sunday, April 8, 2012

DIY Wedding Flowers

I decided pretty early on in my wedding planning process that I would be doing most of the wedding flowers myself (my wonderful friends and family were also a tremendous help and I would have lost my mind without them).

I did a lot of research before I made my decision but knew off the bat that DIY flowers was most likely the way to go to save on cost. For the amount of flowers and style I wanted, having a professional do the work would have cost a very pretty penny. I did interview a couple florists, and discovered that I'd save about half the cost by doing DIY arrangements.

The style of our wedding was glamorous, and our colors were white, black, pink, and gold. I planned to use all white roses sitting upon the tallest possible tapered vases.

My inspiration:


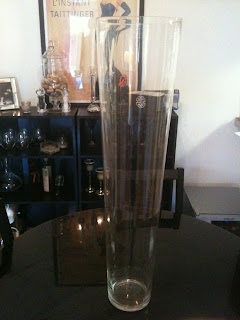
I ordered 12 31 inch, tapered vases from Wholesale Glass Vases International for $25 a piece, which was a steaming deal in comparison to other retailers and wholesale websites I looked at. Their customer service was excellent, and shipping was super fast.

Here's one of the vases sitting atop my kitchen table:

In addition to the vases, I ordered hanging crystal pieces from Koyal Wholesale, you can see the ones I ordered here.

To make your own floral arrangements with fresh flowers, you'll need:
- wet foam bricks
- floral tape
- clear bowl or tray to fit on top of the vase opening
- garden scissors
- buckets
- flowers
- flower food

I ordered 1,000 roses and 50 hydrangeas for all of the centerpieces and bouquets from Costco's wholesale floral department. I will be completely honest and say that the flowers gave me the most anxiety over every other wedding detail. I worried that they'd brown and die under my care, I worried that I'd order them to early and not have them at their prime on the wedding day, and the list goes on. Looking back, I don't regret my decision at all, and I would do it again in a heartbeat.

I was so incredibly lucky to have my friends there for me to help care for the flowers and help arrange them. One of my dear friends had gotten married several months before me used Costco as well, and knew how to care for the flowers once they arrived at my house. She was so incredibly kind to come over the night they arrived, and clipped 1,050 flowers with me.

Here's what boxes holding 1,050 flowers looks like 3 days before your wedding (suitcases, gifts etc everywhere as well):

Before unpacking the boxes, I filled about 20 buckets with water and put the flowers in, in their wrapping to keep the petals safe and closed. After they were all unpacked, we clipped each stem about 1/2 an inch diagonally for better water absorption. This was to be done every other day until arranging the centerpieces, so we only did this a total of two times. Because I was super paranoid, I kept our house as freezing as we could possibly stand to keep all those white flowers alive. Side note: white flowers are very sensitive. One touch to the petals, and they're at risk to brown.

The original plan was to only use roses, but after a trial run, I realized there were too many gaps in the centerpiece, and to fill those spaces would have cost a lot more. Since i love hydrangeas, I decided to add 3-5 to each centerpiece to fill space since they're approximately the size of 5-10 roses a piece. I cannot stress enough how important a trial run is!!!

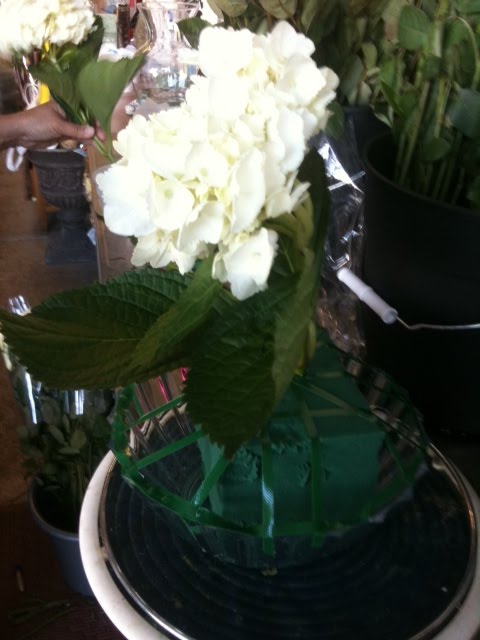
Here's how to arrange centerpieces in a sphere shape:

Step 1: Cut all flowers diagonally.

Step 2: Soak 1 wet foam brick for about 30 minutes in cold water until completely saturated. Once the flowers are placed into the wet foam, they will receive water and stay fresh for several days.

Step 3: Put the wet foam brick in your bowl (I used clear bowls from the dollar store so that they wouldn't show too much through the vases).

Step 4: Place your floral tape in a criss-cross pattern over the entire bowl, on top of the wet foam. This will be your guide as where to place the flowers and it will keep the wet foam from sliding around.

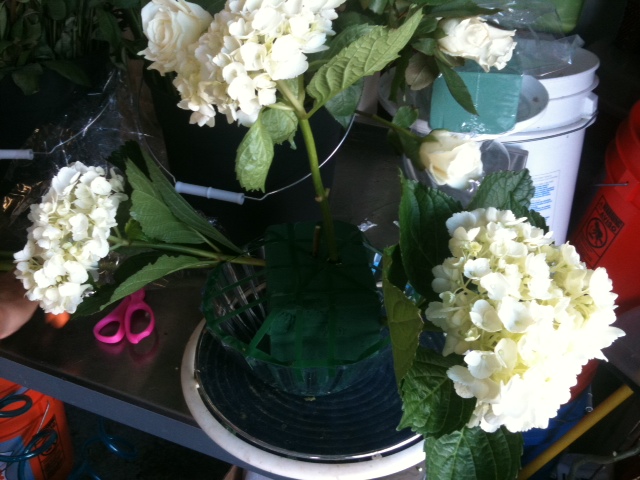
Step 5: Insert 3 hydrangeas in a triangle shape into the wet foam.

We started by placing one in the middle, and then two around it, in the shape of a triangle.

Step 6: Around the hydrangeas, add about 75 roses. Place your bowl directly in/on your vase.

Some of the centerpieces came out a little sparse, but since we had extras, we filled the spaces with extra roses and hydrangeas. Here are a couple before we added a few flowers to fill space:

If you want to add hanging crystal to your centerpieces, you'll need floral picks to loop onto a piece of the crystal hooks, and simply place the picks into your wet foam as desired.

Since I have two cats, I there was no way I was going to keep the completed vases and centerpieces in my house, so I did pay a florist to store them in her shop for one night.

I really hope this was helpful to brides who are thinking of going the DIY floral route. Given how nervous I was about taking on this venture, I wish I had someone tell me it was going to be just fine.
I would love to hear from brides who did their own flowers and what the process was like, and if anyone has questions, please ask!

xo
Lynn



Thursday, March 22, 2012

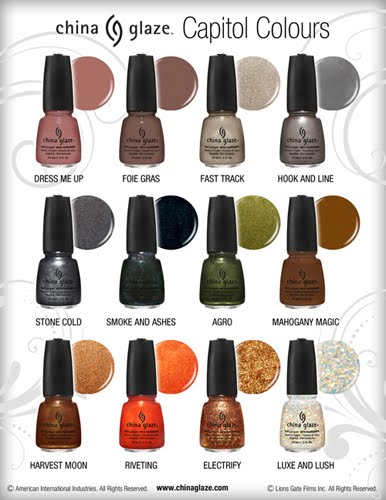
The Hunger Games Nail Polish Collection: Capitol Colours


I don't think I've ever been so excited for a movie premiere in my life as I am for The Hunger Games, which comes out in theaters tomorrow. I read the trilogy, and can't wait to see how the movie compares to the first book.
When I saw the China Glaze Capitol Colours collection inspired by each of the 12 districts in The Hunger Games, I knew I had to pick up some of the colors! My favorites are Electrify, Riveting, and Dress Me Up.
Are there any other Hunger Games fans out there who bought any of these polishes? And an unrelated question: are you team Peeta or team Gale?

Monday, March 12, 2012

Chemical Peels At Home: How To

Chemical peels have been around for a long time-ancient Romans used food acids aka Lactic Acid to peel their skin to reveal younger, brighter looking skin. Today there are so many different chemical peel options, and it can be overwhelming to figure out which is best for your skin.

Picking your poison: 

What kind of chemical peel is best for your skin?

-Lactic Acid: Lactic Acid is one of the safest peels available, and is great as a "first peel". It is safe to use on darker skin tones, and helps to hydrate dry skin. Additional benefits of using a Lactic acid peel are: treats sun damaged skin, improves the appearance of stretch marks, helps with hyperpigmentation, and improves the tone and texture of the skin.
-Glycolic Acid: A more aggressive peel that rejuvenates normal to oily skin, addressing acne, acne scarring, wrinkles, and fine lines.
-Salicylic Acid: Salicylic acid peels are great for oily skin, and are great for the treatment of blackheads.
-TCA: Excellent for acne, lines, wrinkles, sun damage, age spots and general scarring. This peel is deeper than the above three and is longer lasting.
-Jessner's: Great for treating cystic acne.

*Each of these peels can be purchased at varying strengths. I am not an expert on which percentage to choose depending on your experience with peels, but for reference I first purchased the Lactic Acid Peel (35%) and have moved onto the 70%. For first time users, it is very important to use a low percentage. Please check with your doctor and/or use discretion when choosing your strength.

I use the Lactic Acid Peel, and I use both the 35% and 70%. Since the Lactic Acid peel is beneficial to those with rosacea (which I have on my cheeks) and keratosis pilaris, I use the peel on my face and on my arms. The first time I used the 35% peel, my skin did peel, but it was't horrible; my skin just looked like it was extra dry for about three days.

How to use a peel at home:

Step 1: Gather your supplies. You will need a foundation brush (you can use almost any type of makeup brush, but I like to use a dense brush to apply the gel evenly over my face and arms), your gel peel, water, and baking soda. Baking soda neutralizes the peel on contact and stops it from penetrating the skin.
Step 2: Pour a dime sized amount of your peel gel onto your brush and apply evenly over your face (or body), avoiding the eye and mouth areas.
Step 3: Wait 5-10 minutes, then rinse with baking soda and water mixture. Do not leave the peel on overnight. I learned this the hard way!! It was not pretty.


After you use a peel, it is very important to heavily moisturize and to apply sunscreen as your skin will be extra sensitive in the days following the peel. I usually use the peel at night and do not use makeup within at least 12 hours afterwards to let my skin breathe and recover.

I hope this was helpful! I'd love to hear about your experiences with at home peels if you decide to try it!